Common Plymouth Duster, Valiant, Dart, Demon (etc.) Repairs
Electrical and lighting
- Bulbs and fuses for 1974 Chrysler A-body cars.
- LED third brake lights (Valiant test at allpar) and brighter tail-lights and sidelights (Valiant test at allpar).
- Much brighter car headlights (Duster test)
- Other A-body car electrical repairs
Engine and such
When the starter cranks but the engine will not start, the ballast resistor is usually aft fault. Most mechanics will replace the electronic ignition system at the slightest provocation, complaining about Chrysler electronics. This is a good indicator that you need a different mechanic.
The ballast resistor is a white piece of ceramic mounted to the firewall near the windshield wiper motor. There are two sets of wires going into it. Alec Dinwoodie wrote:
Replacing the resistor was in fact easy, and was the problem. I'm wheeled again, for only $6.50. And if it weren't for your page, I'd have spent $50 for a tow, and maybe $50 labor on top of $6.50 parts...
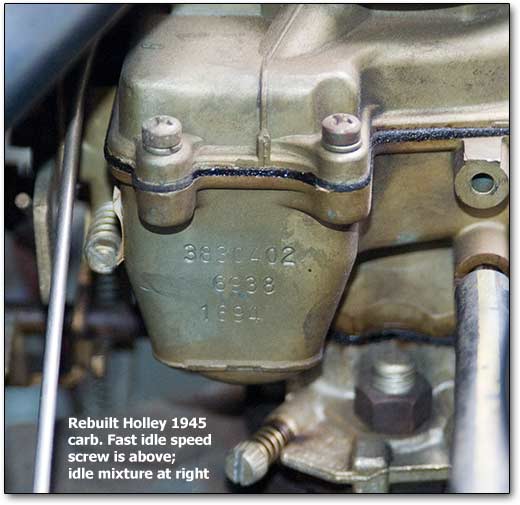 Tuning your carburetor helps to cure idle problems, stalling, and emissions issues. This can be done even by the novice, especially with the simple single barrel carburetors common to Valiants.
The crankcase ventilation system and the crankcase inlet air cleaner should be cleaned once a year to avoid power loss and smoke. Some reported that the filter on their charcoal canister also had to be replaced fairly often. These are sometimes original and uncleaned.
Some other common repairs:
- Speedometer cable replacement and regreasing to prevent problems
- Fixing the windshield wiper linkage.
- Fixing electrical problems and alternator upgrades.
- Allpar has a guide to upgrading cars from points to electronic ignition. Also see their guide to replacing or gapping points.
Wet weather stalling and idle problems can be fixed by using a high quality distributor cap and rotor (e.g. Standard CH-410 and ACCEL 130319), distributor cap gasket (Standard PN AL-483G), silicone covered wires (e.g. Magnecor or Aurora), and by putting weatherstrip foam over the ignition and voltage regular modules.
A common problem on slant six engines is exhaust manifold cracking. Wes Moeller suggested getting a Dutra Dual Exhasut Manifold. He casts new manifolds for the first three cylinders, then you modify a stock exhaust manifold by cutting off the front leg in front of the outlet and capping the opening. Then, Dan Stern says, use a 2-into-1 Wye (“Y") pipe such as Flowmaster 200225. Use a cracked exhaust manifold by sending it to Doug Dutra to make into the rear-3 part of the Dutra Dual system.
Dave Wordinger wrote that many fuel tanks are interchangeable: "According to the 1950-65 Chrysler Products Interchange Manual, the 1960 Valiant and 1961 Valiant and Lancer (non-station-wagon) use the same tank. The 1960 and 1961 station wagons use a different tank. All 1962s use a different tank, 1963s use another different tank, and 1964 and 1965 use the same tank, but different than all previous years." Daniel Stern qualified that gas tank groups are 1960-61 (except wagons), 1962, 1963, 1964-66, 1967, 1968-69 (and 1970, except California), and 1972-76 US/Canada (1970-71 California is part of this last group).
Starting problems. Zachary Good wrote that when the choke sticks shut on startup, “When car's been driven that day, don't give it any gas when you start it (floods the carb). [If it won’t start,] grab a clean screwdriver, pliers, etc., stick it down the throat of the carb, keeping the choke open. Crank it with a decent amount of gas. Don't have someone looking into the carb, that backfiring could take off their eyebrows.” To actually fix the problem, Daniel Stern said to fix the faulty choke thermostate, linkage, and/or pull-off.
See the "instrument panel and controls" section for more failures to start.
As for the spark plugs... 1960-62 heads require ring washers on the plugs. 1963-74 cars require that you do not have the washers on, and will need to take them off. The goal is to prevent the plugs from running too hot, and to have correct placement.
Regarding the slant-six oil filters: until early 1962 production, there was no standpipe, just a short nipple with one end screwed into the oil pump and the other end threaded to accept a spin-on oil filter (this is how most replacement oil pumps have come for many years, so many slant-6 engines are equipped this way).
Early in 1962 production, a standpipe was added to the nipple to provide a slight extra margin of oil retention, to address complaints that the oil light didn't go out immediately upon startup first thing in the morning. There are two 1962 TSBs on the subject; the first one describes a filter-to-pump nipple with a standpipe to replace the plain nipple, to quicken the oil light shutoff time on cold start. The second one, issued awhile later, described a filter-to-pump nipple with standpipe and valve.
The early standpipe (part 2402 607) is too tall for the “shorty” filter introduced in 1972-73 to make room for various emissions-related components on certain V8 engine installations. Chrysler wanted to standardize oil filters, so they shortened the slant-6 standpipe (new p/n 3577 848). That, and only that, is the reason why the shorter oil filter was adopted. There is one filter with a built in standpipe, the Wix 51805.
If replacing the fuel tank or filler pipe, Bob Lincoln warns to replace the fuel filler grommet. “It's the same one used by Chrysler for the last 40+ years, the dealers have them for about $15. Install it in the tank first (“domed” side out, it acts like a dust seal), then lube it only with power steering fluid, not engine oil, vegetable oil, or other lubricants, they will attack the rubber. Lubing it will help installing the pipe. No RTV or sealants are necessary, and they will not work anyway, gas will attack them.” (Any fuel system work should be done with caution by someone with experience and skill.)
Gas tanks and filler tubes were made of Terneplate, a steel plated material with four layers of lead to one part tin; it can be buffed to a very high shine, unlike galvanized metals.
Body (external) and suspension
The biggest problems with the Valiant were rust in the rear quarter panels due to a bad weld and water leaks through the dashboard (curable by taking the steps in this link). These led one columnist to comment that the Dart's combination of water leaks and unkillable drivetrains led thousands of people to drive around with wet feet.
Adjusting torsion bars: the sophisticated Valiant suspension sometimes needs adjustment. Randall Norton wrote: "The adjusting bolt [on the 1962] is near the middle of the lower control arm. Park the car on a level flat location. Jounce the car. Measure the distance from the bottom of the lower control arm to the floor. Measure the distance from the bottom of the steering knuckle, and check the difference. I don't have a 1963 manual, but for 1962 the difference should be 1 7/8 inches for standard suspension and 2 1/4 for heavy duty suspension. For 1964, the measurements are 1 3/4 and 2 1/8. Do the same thing on the other side, then go back to the first side and check the measurements again. Repeat as required. "
RKJGuy@aol.com says: $150 will buy a new weatherstripping kit for ragtop Valiant/Darts. The store is Andy Bernbaum Auto Parts, (614)244-1118. He also suggested Kanter for other parts; they are at (800) 526-1096 (US). Mention code W615-HMN56 and get a free (usually $3) catalog!!.
John Harris wrote that Valiants' "left handed [wheel bolt] threads on the one side only as I remember. It was a good theory and practice at the time because of wheel rotation the the nuts could come off. But most of the time some tire guy will wreck your studs and bolts anyway because they use impact wrenches that are not calibrated, just turned up to 'as tight as possible.' If this happens get them to replace the studs with standard right hand studs and new nuts, smile and call it a day."
Bill Watson wrote: on U.S.-built Valiants, the paint code appears on the data tag under "PNT". The first letter is the roof colour, the second the body colour. The number following the paint codes denotes colour scheme - 1 for single tone and 2 for two tone. A third letter is for the interior door and upper door frame colour. The following is a list of 1963 Valiant colour codes :
| B - Ebony Black C - Light Blue D - Medium Metallic Blue E - Dark Metallic Blue |
F - Light Green G - Metallic Green M - Light Beige N - Silver Gray Metallic |
P - Red W - Ermine White X - Medium Beige Y - Metallic brown |
Replacing window tracks (from dana44)
Pull the door handles off, remove the door panel, lower the window about halfway and you will see the track on the bottom of the window.
If you are talking about the rear or front guide, there should be one or two felt pads on the inside along the top to guide the glass, then there is one or two bolts/studs (depending) top and bottom of the guides to remove them.
To remove the glass from the regulator itself, which is a pain but makes it easier not to have to worry about breaking the glass, undo the three bolts holding the window regulator to the door inside panel, and from there is a play to see what works.
Sometimes it is then raise the glass and slide the regulator off the bottom track and the glass will pull all the way straight up and out of the door, other times the regulator itself has to be in a certain up or down position in order to get the glass of the bottom track, so play with that just a bit.
There should be a rubber cover on the end with four phillips screws that seal the door to the body, those have to come off to get the glass out. Door handles should have an allen wrench screw to hold them in place, large phillips screw for the arm rest. Use a flat stiff one inch wide putty knife to undo the panel clips. Slip the knife between the door and panel, slide it sideways until you find a clip, then gently pry at the clip, might want to use another knife or flat screwdriver on the opposite side, they tend to break the cardboard panel if you get too rambuntious.
Interior
Adding shoulder belts or rear seat belts can save lives
You’ll probably need to remove and clean your carpet or remove the seats at some point.
If you find your windshield wipers only work when dry, try putting window foam tape over the wiper motor to keep the water out. If they don’t work at all, try fixing the windshield wiper linkage.
We have details on heating and ventilation systems.
Iver Krogh writes that gas gauge failure may actually be due to loss of the ground strap clipped between the gas level sending unit outlet and the steel fuel line on the frame.
Some Valiants (and other cars) will not start in Park, but can be started in Neutral. Bill Watson wrote that the shifter linkage might be out of adjustment:
The linkage from your steering column attaches to an "arm" that sticks out from the tranny on the driver's side. Get under the car while someone moves the gearshift linkage. Place the car in park, loosen the bolts to the "arm", push the arm all the way in the direction park is engaged. Then push your gear level all the over the left - as far into "P" as it will go. Then tighten everything up.
Or the problem could be the neutral safety switch, if it will not crank at all and the battery is good:
As for finding the neutral safety switich, there will be a small wire attached to your starter solenoid that leads down under the floor toward the transmission. Follow this wire. You will find the neutral safety switch at the other end of it.
Bill Watson wrote this about replacing the ignition switch on a 1963 Valiant. It should work on any Valiants with instrument panel-mounted ignition switches.
If you look closely at the switch in the dash, there is a bezel that screws onto the ignition switch. You will find 4 small slots on the inner side of bezel, each a quarter of the way around. I usually use a screwdriver, carefully, to move the bezel in a counterclockwise direction. Once it moves, you can undo it by hand.
Once you get the bezel off, notice that the switch has a ridge along the bottom that fits into a corresponding slot in the dash. This keeps the switch stationary while you screw the bezel on/off. Once the switch is free, you can drop the switch under the dash and pull the wire connector free.
To install, place the wire connector onto the new switch, place the switch into the dash (note the ridge/slot) and screw the bezel back on. Use a screwdriver, or some similar object, to carefully tighten the bezel onto the switch when you get it as tight as you can by hand.
Some people have adapted K-car bucket seats to the Valiant.
1962 Valiant instrument panel repairs
“52DodgeCoronet” wrote:
How do you remove the headlight and wiper knobs on a '62 Valiant? The Valiant instrument panel was somewhat redesigned from the 1960-61 version, for which the manual says to reach around behind the instrument panel to push a release on the headlight switch.
For the 1962 Plymouth Valiant, you stick a tiny screwdriver up into the (almost invisible) slot on the bottom of the knob, and that releases a spring clip and lets the knob slide off.
To remove the pushbutton gearshift assembly from the dashboard (which appears also to have changed from 1961): after removing the instrument panel escutcheon to gain access, pry apart the pushbuttons a little bit to find a couple of 3/8" hex huts back inside, on studs that face toward the rear of the car. Remove those hex nuts and the park lock knob from the park lever, and carefully maneuver the pushbutton assembly back, down and out of the dashboard.
Thanks to Pat Blais of T-Flite Patty's Transmissions in Washington for his help.
Details on suspension problems.
 Your Privacy Choices